
How to Fit a Letterbox: The Ultimate Step-by-Step DIY Guide
Fitting a letterbox to your external door is a DIY task that can instantly level up both the convenience and appeal of your main entrance.
Whether you’re adding a letterbox to a new wooden door, swapping out an old one on a uPVC door, or figuring out if you can tackle a composite door, we’ve got you covered.
In this useful guide, we’ll walk you through everything from measuring up and cutting the slot to tips for different door materials, as well as troubleshooting some common issues. By the end, we’re pretty sure you’ll be able to install your letterbox like a pro.
What’s covered in this article?
Do I need a professional to fit a letterbox?
Tools & Preparation
Measuring and Marketing the Door for a New Letterbox
– Are letterboxes a standard size?
– My door is extra thick/thin, will any letterbox fit?
Step-by-Step: How to Fit a New Letterbox in a Wooden Door
– Can I fit a letterbox in a fire door?
Replacing an Existing Letterbox
Fitting a Letterbox in a uPVC Door
Fitting a Letterbox in a Composite Door
Letterbox Fitting Tips & Troubleshooting
Summary
The first question we often get asked is…
Do I need a professional to fit a letterbox or can I do it myself?
For the majority of cases – especially adding or replacing a letterbox in a wooden or uPVC door – it’s considered a mid-level task, so a competent DIYer can handle it with basic tools. Taking your time with measuring and cutting is the main thing. However, there are situations where calling a professional is a wise decision:
- If you have a very expensive door, fire rated or a composite door that you worry about damaging, a professional installer has the right tools to do a clean job and if reputable, will also assume liability for any mistakes.
- If you’re not comfortable with power tools or making precise cuts, there’s no shame in hiring a pro or even a handyman/joiner. The cost of a mistake can far outweigh a one-off service charge.
In general, though, fitting a letterbox should be a satisfying and somewhat straightforward DIY project and with this guide in hand, we’re confident you can do it!
Tools and Preparation
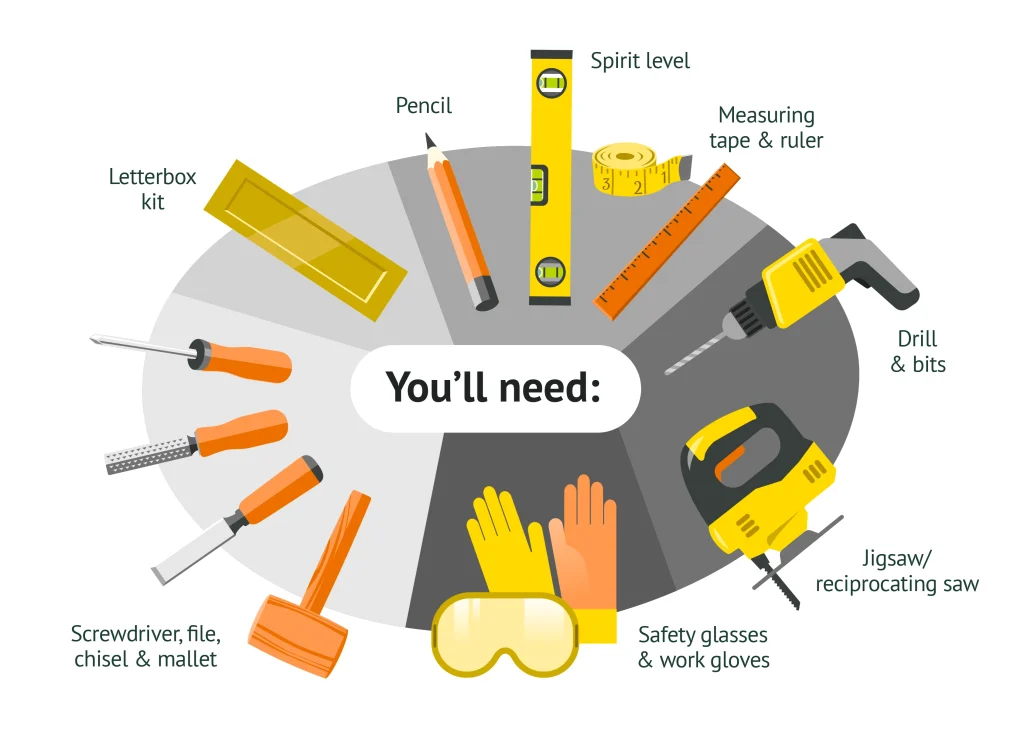
Before you begin, it’s important to gather the right tools and prep your workspace. Having everything on hand will make the job much smoother. Here’s what you’ll need:
- Letterbox kit: External and internal plates with inner and outer flap, screws/bolts and sleeve if provided.
- Measuring tools: Measuring tape, ruler, pencil and a spirit level for accuracy.
- Drill: With bits (a small bit for pilot holes and a larger 8-16mm bit for starter holes).
- Saw: A jigsaw or pad saw with a blade suited to your door material (wood blade for timber, metal/plastic blade for uPVC/composite).
- Safety gear: Safety glasses and work gloves.
- Other tools: Screwdriver, sandpaper or file (to smooth cut edges), a chisel and mallet (a narrow chisel can be helpful if you need to square corners or cut any recesses).
- Optional: Masking tape (to mark lines and reduce splintering), a drop cloth if working indoors (though most of this work is from the door’s exterior side). Also, a silicone sealant can be useful for weatherproofing the new letterbox.
Most DIYers can install a letterbox in about an hour or two with these tools. If you’re new to DIY, set aside a free afternoon, there’s no need to rush.
TIP: If your door can be easily removed from its hinges, laying it flat can make cutting so easier. However, you can definitely fit a letterbox with the door still hung – just be prepared for some sawdust. Make sure the door is secure (latched or wedged) so it won’t move while you work.
As our Technical Director, Matt Shaw, often says: “Measure twice, secure the door and take your time – the prep work makes all the difference.”
Now, let’s move on to marking out the perfect spot for your letterbox.
Measuring and Marking the Door for a New Letterbox
Proper measurement is key. Follow these steps to mark out where the letterbox will go:
Choose the Height and Position
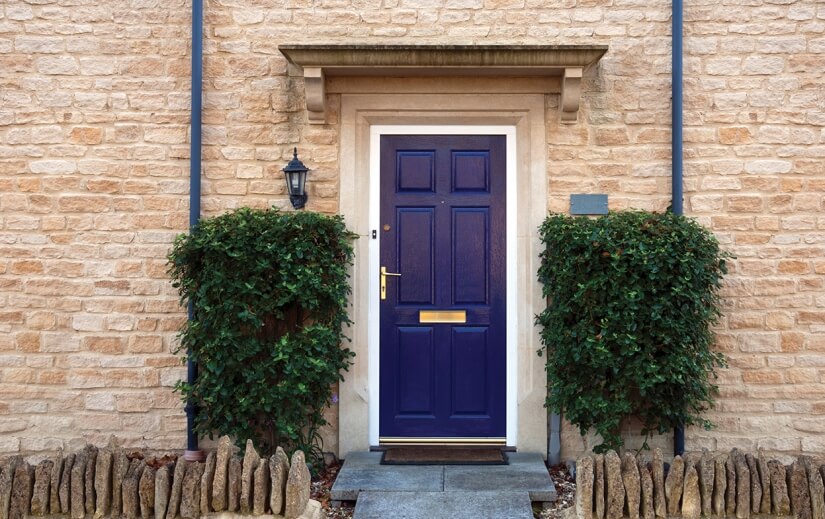
There’s no strict rule that a letterbox position must be dead-centre, but traditionally it’s placed roughly halfway up the door or aligned just below the door handle. This height is convenient for both you and your postie. In fact, British and European standards recommend a letterbox slot between 700mm and 1700mm off the ground for ergonomic and safety reasons, a bill was also put to parliament recently to make it a requirement under Part M of UK building regulations on all new builds and on all new external doors supplied.
Once you’ve picked a spot that looks balanced on your door and is easy to reach, mark a light pencil line at the desired height on both sides of the door (inside and outside) if possible.

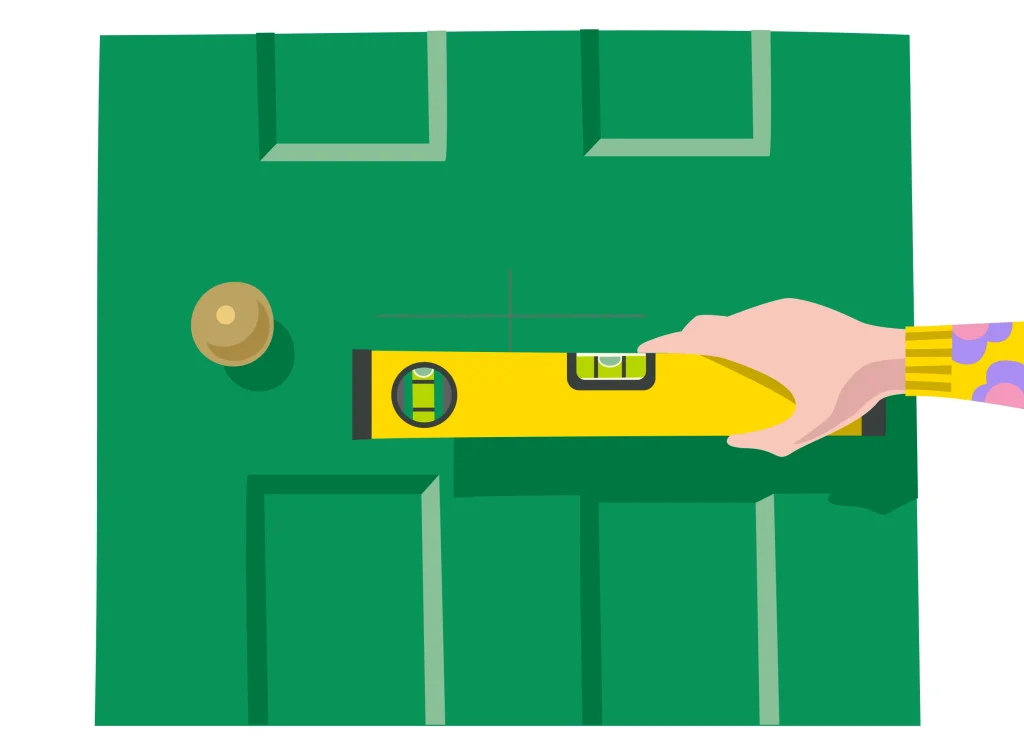
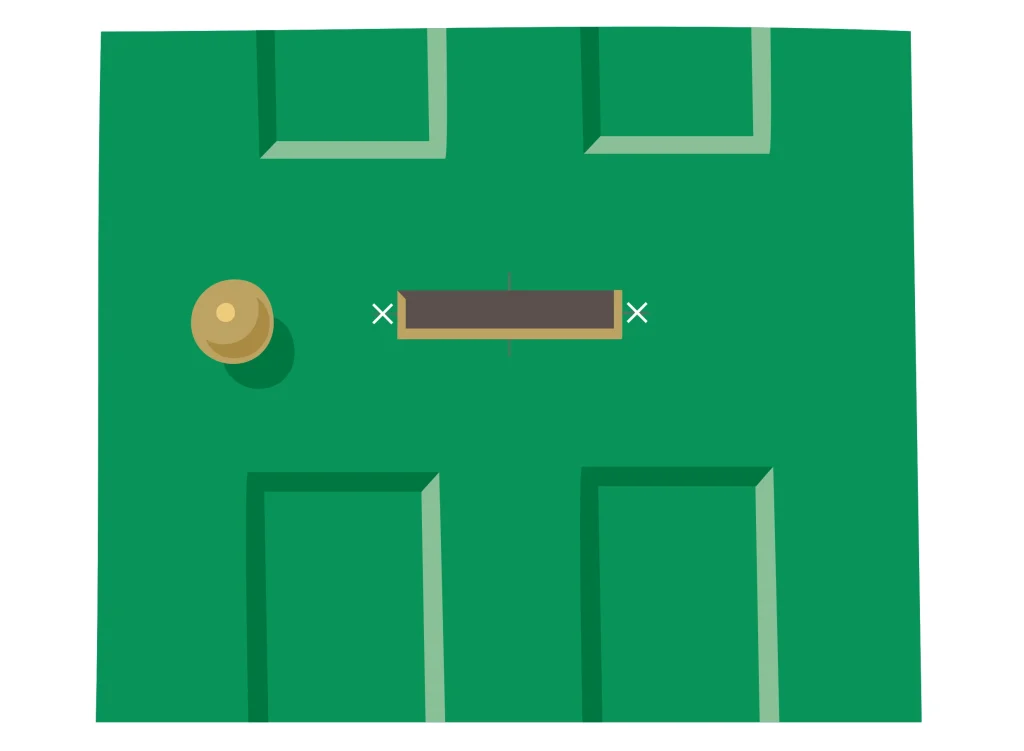
Centre It Horizontally
Measure the width of your door and mark the centre point at the height you chose. This makes sure the letterbox will be centred left-to-right. Use a spirit level to draw a straight, level line through that point on the door’s exterior face.
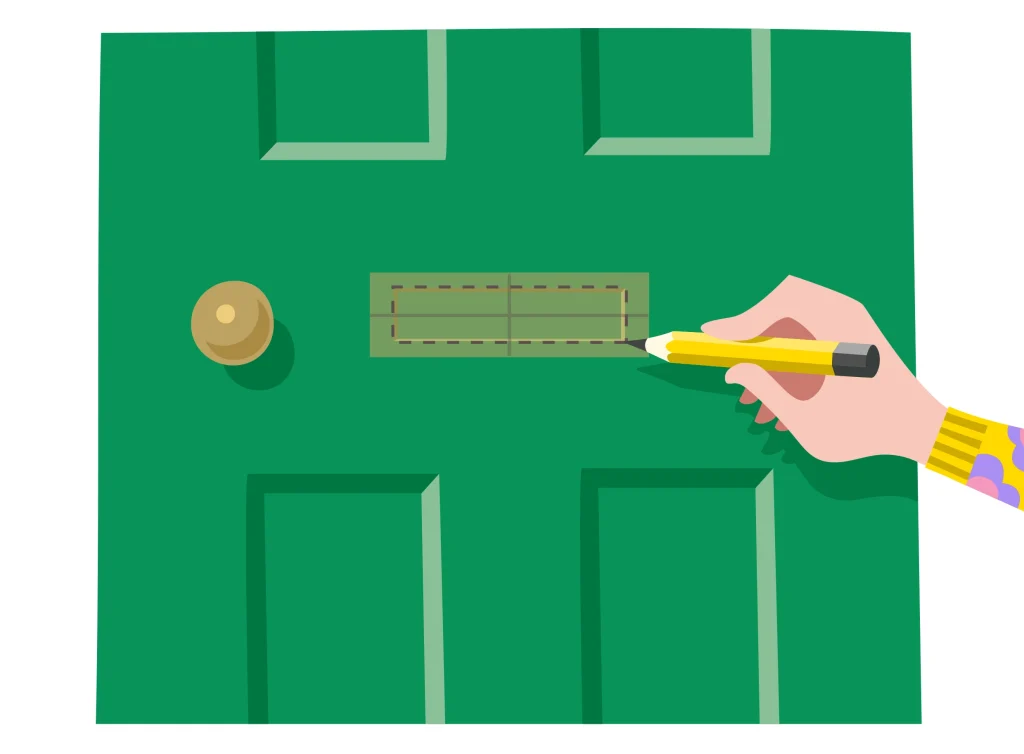
Outline the Letterbox Opening
Hold your letterbox (the external plate) against the door where it will go. Centre it on the line. Mark the horizontal width of the mail slot and the overall width of the plate if you like. Typically, you’ll cut a rectangular hole slightly smaller than the outer flap dimensions.
It’s vitally important you only outline the inner opening (the hole mail passes through), not the entire outer plate because you want the plate to overlap around the hole. If your letterbox came with a template or instructions indicating the opening size, use those measurements, otherwise, measure the flap opening on the letterbox itself. Mark a rectangle on the door for the cut out, slightly larger (a millimetre or two extra on each side) than the flap size to allow some wiggle room. Ensuring your lines are level and the corners are square is crucial for a neat result.
Double-Check Everything
Step back and eyeball the positioning. Is it centred and at a good height visually? Open your door to make sure the marked spot isn’t interfering with any frames or internal bolts. If it all looks good, you’re ready to cut.
One of the biggest mistakes is rushing the measurement,” Matt notes. “Take your time to mark everything accurately – measure twice, cut once to avoid a wonky letterbox or misaligned plate.”
A few extra minutes spent measuring will save a lot of headache later!
Are letterboxes a standard size?
Letterboxes come in a few standard sizes, but there is variation. The most common sizes in the UK are 10-inch and 12-inch letterboxes, which refer to the outer plate width.
A 10-inch letterbox typically has an internal slot of around 8-9 inches wide (203-228mm), suitable for standard letters, and an outer plate about 265-280mm wide. A 12-inch letterbox might have a slot around 10-11 inches (254-279mm) to accommodate larger envelopes with an outer plate 300mm or so wide. The height of the slot is usually around 40-50mm (enough for a big envelope or small parcel).
When buying, always measure your existing slot or the space available, don’t assume one size fits all. For replacement letterboxes, also check the distance between fixing screws – many 12-inch letterboxes have screws about 270mm apart.
My door is extra thick/thin, will any letterbox work?
Letterboxes are designed for a range of door thicknesses. Standard external doors in the UK are typically 44mm thick (especially composite/wooden exterior doors). uPVC doors can vary more widely, typically ranging from 28-70mm if including a decorative panel.
Most letterbox kits have a telescopic sleeve that adjusts, with some covering 20-40mm, others 40-80mm. If your door is unusually thick make sure to get a letterbox labelled “extra deep” or check its spec for max thickness. On the other hand, if the door is thin you might need to trim the sleeve or choose a model that suits that thickness.
Always check the product details, they’ll usually state the allowable door thickness. If in doubt, you can also use a plain letter plate without an internal sleeve (like the old-style ones were just two plates sandwiching the door), but you might then need to line the cut out yourself to protect the door.
Ultimately, there’s a letterbox for almost every door, just be conscious of the size when choosing to make sure you get the right letterbox.
Step-by-Step: How to Fit a New Letterbox In a Wooden Door
Now for the exciting part… cutting the hole and installing the letterbox. The following steps are specifically for a wooden external door. If you have a uPVC or composite door, the overall process is similar, but we’ll cover special considerations for those materials in the next sections.
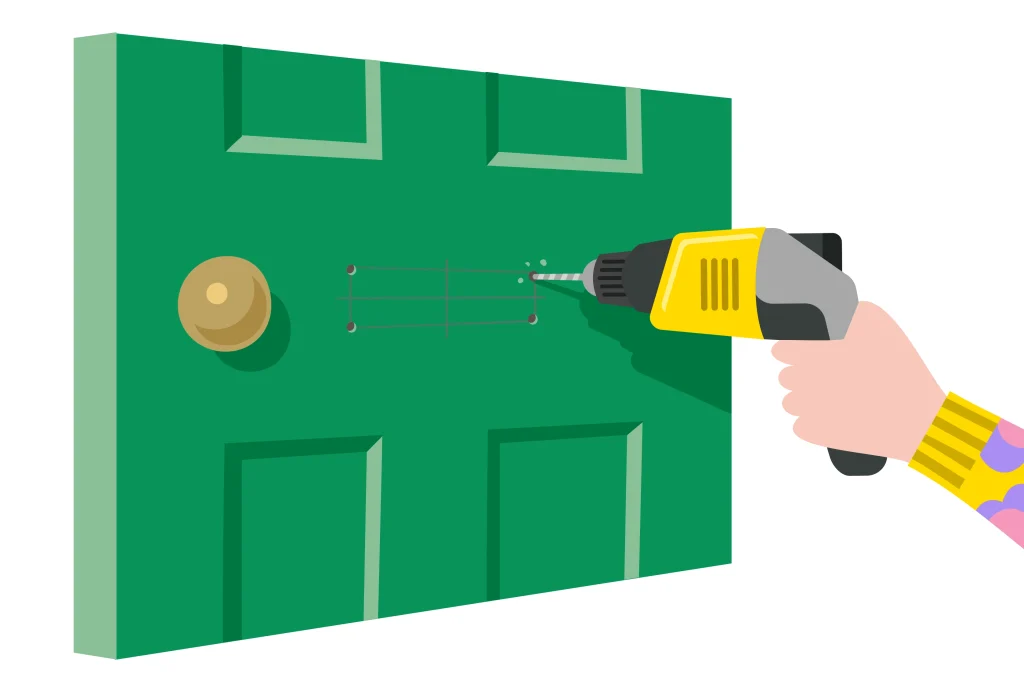
Step 1: Drill Corner Holes
After marking the rectangle for the opening, start by drilling holes in each corner of your outlined rectangle. Use a drill bit large enough to create an entry point for your jigsaw blade (about 8mm is usually enough for a thin blade), or 16mm for a standard jigsaw blade.
TIP: To avoid splintering the wood, don’t drill straight through in one go. Drill from the outside face until the bit’s tip just pokes through, then finish the hole by drilling from the other side of the door. This technique keeps the wood around the hole edges nice and clean. Do this for all four corners of your rectangle.
Step 2: Cut Out the Letterbox Slot
Put on your safety glasses for this part. Insert your jigsaw blade into one of the corner holes. Steady the saw and carefully cut along your marked lines from hole to hole, essentially “connecting the dots” to cut out the rectangle. Cut just inside the lines, it’s better to leave a tiny amount of extra material that you can sand or file down later for a perfect fit. Take it slow and steady, guiding the saw along the line. If your door is hardwood, let the saw do the work and don’t force it. Once you’ve cut out the rectangle, remove that piece of door, you should now have a rough hole for the letterbox.
- If you don’t have a jigsaw: A pad saw (keyhole saw) can be used by hand. It takes more effort, but the process is the same: drill starter holes and then saw along the lines. Go slowly to stay accurate.
- Clean up the opening: Use sandpaper or a file to smooth the rough edges of the cut out. Ensure the corners are squared off so the letterbox will sit flush. If there are any uneven bits or the hole is slightly undersized, file them until the letterbox slides in without force. It’s better to trim little by little than to have a hole too large!
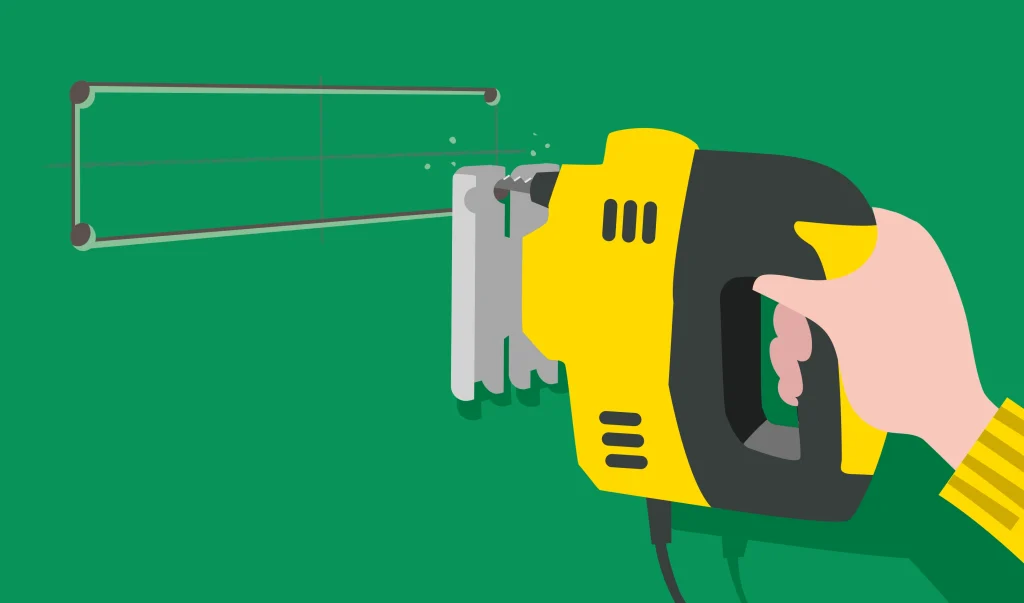
Step 3: Drill the Fixing Holes
Most letterbox plates have two bolts or screws (usually on the inside flap piece) that go through the door to secure the exterior plate. Hold your letterbox up to the hole and mark where the screws/bolts will go. Usually, there’s one at each end of the slot, or a pair on each side. Mark these on the door faces. Remove the letterbox and drill pilot holes at those marks. Use a drill bit slightly larger than the bolt diameter so the bolts will pass through easily. Again, drill halfway from outside and halfway from inside if you’re going through a thick wooden door, to prevent any splitting.
Note: If your letterbox uses lug fixings (anchors that don’t go all the way through), only drill to the required depth, not through the door (check the letterbox instructions if applicable).
Step 4: Install the Letterbox
Time to put it all together! From the exterior side of the door, insert the outer letterbox plate into the hole (usually the flap faces outward, hinge at the top). From the interior side, align the inner plate so that the screw holes line up. Insert the fixing bolts or screws through and tighten them up. Usually, bolts will go through from inside and secure into the outer plate, or sometimes nuts are used on the inside. Tighten firmly but not excessively, over-tightening can warp the door or the letterbox and might make the flap stiff.
Once secured, open and close the letterbox flap a few times to make sure it moves freely and isn’t catching on the edges of the hole. If it rubs, you might need to loosen the screws slightly or file a bit more from the opening.
TIP: For wooden doors, it’s wise to seal any exposed bare wood where you cut. Before installing the letterbox, you can paint the raw wood edges of the hole with a bit of primer or exterior paint to protect against moisture. Also, many modern letter plates come with a brush or rubber draught excluder on the inside, if yours doesn’t, consider adding one to keep out cold drafts and rain.
Step 5: Final Touches
With the letterbox fitted, check both sides: the outer flap should sit flat and spring closed nicely; the inner side should be neat and flush. If your letterbox kit includes a plastic or telescopic sleeve (a liner that goes through the hole connecting inside to outside), make sure it’s snugly in place to line the cut out. Apply a thin bead of silicone sealant around the edges of the outer plate (on the outside of the door) to seal any tiny gaps and prevent water ingress – this is especially important for external doors exposed to rain. Wipe off excess sealant for a clean look.
Congratulations, your new letterbox is installed! Now stand back, admire your handy work and appreciate a job well done!
“Stepping back to admire your handiwork is the best part”, Matt says. “You’ve not only made receiving your post easier, but you’ve done it yourself… great job!”
Can I fit a letterbox in a fire rated door?
In short, yes you can, but there are some considerations you need to make. If you’re wanting to install a letterbox in an external fire door, you must use a fire-rated letterbox unit. These have intumescent liners that swell in heat to block fire and smoke.
The fitting process is similar, but you cannot just cut any hole, it should be done according to the fire door manufacturer’s guidelines (and sometimes by a certified installer). Always check the fire rating requirements as using a non-rated letterbox in a fire door will void its certification and could be dangerous.
Replacing an Existing Letterbox
Replacing a letterbox is usually much simpler. Perhaps your old letterbox is damaged, draughty or just outdated? Here’s how to swap it for a new one:
Step 1: Remove the Old Letterbox
Open your door and on the inside, lift the letterbox flap. You’ll typically see two screws (one at each end or top and bottom of the flap). Unscrew them and the interior part should come off. Then, go outside and pull off the outer flap piece, the two halves will separate once screws are out. If it’s been painted over or stuck with sealant, you might need to gently pry it with a flat screwdriver.
Step 2: Measure the Opening
Clean up any old sealant or debris so you have the clear original cut hole. Measure the hole’s width and height, and the distance between screw holes if present. This is crucial for buying the correct replacement. As mentioned, letterboxes come in a few standard sizes, but not all are identical.
Make sure your new letterbox’s sleeve or flap will cover the existing hole dimensions. Check that your new letterbox is suitable for your door’s thickness and the screw fixing centres match (or at least will cover the old holes).
Step 3: Install the New Letterbox
This is essentially the same process as step 4 above. Insert the new letterbox’s outer plate, align the inner plate, and fasten the screws/bolts. Make sure any integrated gasket or seal is in place (many come with a foam or rubber backing to stop draughts). Tighten the screws evenly. Your new letterbox should cover any old marks and sit securely. Test the flap action – it should open smoothly and snap shut firmly (most have a spring).
If the new unit is slightly smaller than the old hole, you might need to fill gaps or choose a larger letterbox to properly cover the opening. Usually, going for one that’s the same or a bit larger is easiest.
“When replacing an old letterbox, I always tell customers to take the old one to the shop when buying a new one”, says Matt Shaw. “Little differences in size or screw positions can be a huge pain otherwise. Getting a good match makes the swap a 15-minute job rather than a full afternoon.”
Now that we’ve covered standard wooden doors, let’s talk about the special cases: uPVC and composite doors, which have a few extra considerations.
Fitting a Letterbox in a uPVC Door
Can you fit a letterbox to a uPVC front door? Absolutely! Most uPVC doors will come with a letterbox already fitted, but if yours doesn’t it’s easy enough to fit one, with the process similar to wooden doors but with a few tweaks:
- Door Construction: uPVC doors often have a steel reinforcement and insulation inside, or a removable panel. If your uPVC door has a removable foam panel or a glazing panel where the letterbox goes, consider taking that panel out to cut the hole (it’s much easier to cut a loose panel than an installed vertical door). If not removable, you’ll cut it in place like a normal door.
- Marking & Cutting: Use masking tape on the cutting area to prevent the plastic from chipping. Mark the slot outline the same way as a wooden door (centred and level). When drilling corners, uPVC won’t really splinter like wood, but using a smaller drill bit first can make a neater job.
Use a fine-tooth jigsaw blade suitable for metal/plastic to avoid cracking the uPVC. Cut at a lower speed to prevent melting the plastic. The foam or hollow core will cut easily. If you hit any metal reinforcement, you might need a metal-cutting blade or even a small hacksaw blade to finish that section. Many uPVC door designs avoid reinforcement where the letterbox goes, but be prepared just in case. - Fitting the Letterbox: Most letterboxes for uPVC doors are sleeved letterboxes, in that they have an inner and outer part that slide together through the door, creating a tunnel. The sleeve usually adjusts to door thickness and the two halves screw together tightly, clamping the door skin between them.
Make sure you have the right size. If your door is thinner, the sleeve might need cutting down (many have markers where you can trim them to size). Insert the outer half, then the inner and push them together. Hold them aligned and insert the screws provided from the inside to secure. Because uPVC is a smoother, flimsier material than wood, do not overtighten the screws, just snug enough so there’s no wiggle. Over-tightening can crack the plastic or distort the letterbox and ultimately ruin your door.
When done, your uPVC door’s new letterbox should look factory-fitted. Open and close the flap to test the springs. Modern uPVC letterboxes often have anti-snap flaps or won’t open fully 180°, this is normal and even a security feature on some (to prevent someone fishing through). As long as mail can go in and it closes, you’re set!
Is it easy to cut a uPVC door for a letterbox?
Yes. With the right tools and care, it’s quite doable for a keen DIYer. If at any point you feel unsure about cutting into a uPVC door (especially if it’s a high-end one), remember you can consult a professional. But generally, this should be a straightforward DIY job for those confident in their skills.
Fitting a Letterbox in a Composite Door
Can you put a letterbox in a composite door? This is a very common question, and the answer is yes, but with caution. Composite front doors (made from a mix of GRP/fiberglass, wood, foam and sometimes metal) are tough and durable, which unfortunately also means modifying them is a bit more challenging. Here’s what you need to know:
- Check Warranty and Design: First, if your composite door is new or under warranty, adding a letterbox yourself could void that warranty. Many composite door manufacturers recommend ordering the door pre-fitted with a letterbox or having it installed by a professional. It’s worth checking your door’s documentation. If the door was supplied without a letterbox, they might have intended it to use an external mailbox or have one fitted by them.
- DIY Installation: If you decide to cut into the composite door yourself, the process is similar to wood and uPVC (mark, drill, jigsaw etc). However, the GRP exterior skin of a composite door is extremely hard and can splinter or crack if cut incorrectly.
Using a high-quality carbide jigsaw blade or a router with a template is recommended for a clean cut. You’ll want to mask off the area to protect the door’s finish from scratches. Drill corner holes like before (to prevent cracks, go slow and use sharp drill bits). A router can make a neat rectangular cut out if you have the tools and skill. Otherwise, a jigsaw at a slow speed can do it but be prepared to possibly wear out a blade or two because of the tough skin. - Internal Construction: Once through the outer layer, you may encounter foam core or a wooden sandwich core. Cut through those as needed. Some composite doors have steel reinforcement or multiple layers, if you hit metal, switch to a metal-cutting blade as necessary.
- Fitting the Letterbox: Use a sleeved letterbox suitable for composite doors (many uPVC ones are fine). These often have screws that go through to secure, similar to uPVC. Because composite doors are usually thicker (44mm is common for UK composite front doors), ensure the letterbox’s sleeve can extend that far (most 12-inch letterboxes for composite do 40-80mm thickness). Slide in the outer and inner pieces and screw together. Again, avoid over-tightening to prevent stressing or cracking the composite material.
- Finishing: The cut edges in a composite door might expose wood or foam. It’s a good idea to seal those edges, you can use paint, resin or even just a bead of silicone around the inside of the cut out to seal the core from moisture. Definitely apply some silicone around the outer plate for waterproofing, since composite doors are highly weather-resistant and you don’t want to introduce a leak point. Clean up any debris (fiberglass dust is itchy, so wear a dust mask and gloves when cutting). Test the flap operation. With composite doors being thick, make sure the flap opens freely and isn’t hindered by the depth of the sleeve.
IMPORTANT: If you’re not confident in your fitting ability, hiring a professional for a composite door is recommended. The last thing you want is to damage an expensive door.
Matt cautions, “Composite doors are a significant investment, if you’re at all unsure about cutting into one, don’t do it and get professional help. In my experience, it’s money well spent to avoid a costly mistake.”
Many professional installers have templates and heavy-duty tools to do it cleanly. But if the composite door already had a letterbox (and you’re just replacing it), doing it yourself by unscrewing the old and fitting a same-size new one is normally quite straightforward. Just be gentle and follow the replacement steps we covered.
Letterbox Fitting Tips and Troubleshooting
Even with a perfect installation, you might encounter some quirks as time goes on. Here are a few common letterbox issues and how to address them:
- Draughts or Cold Air: If you feel a chill through your new letterbox, consider adding a draught excluder. Many letterboxes include brush strips or rubber fins inside the flap; if not, you can buy stick-on brush linings for the slot. Also make sure the letterbox is seated properly, any gaps around edges can be sealed with silicone. A well-fitted, modern letterbox with brushes should virtually eliminate draughts.
There’s great emphasis put on letterboxes that seal well these days, because a leaky letterbox can contribute significantly to heat loss, which can impact compliance with Part L of UK building regulations. - Flap Flapping in the Wind: A rattling letterbox flap in a storm can be annoying. This usually means the flap’s spring tension is weak or there’s no bump stop. You can fix this by sticking small adhesive foam pads on the inside of the outer flap corners so it has a soft close. Another DIY trick is to attach a tiny magnet if the flap is metal, to keep it pulled shut (just strong enough to hold against wind, but not so strong that mail won’t push through). Some high-quality letterboxes come with integrated magnets or stronger springs to prevent this.
- Stiff or Stuck Flap: If the flap doesn’t open smoothly, first check for mechanical issues: Are the screws too tight and pinching it? Loosen slightly and test. Is paint or sealant causing the flap to stick? Clean any obstruction. For metal flaps, a spray of silicone lubricant on the hinge pin can help. If a new letterbox is stiff, it usually loosens up with use. Also make sure the hole cut is large enough and not binding the flap or inner sleeve.
- Condensation or Water Ingress: If you notice rainwater coming in, double-check the external seal. There should be no gaps around the outer plate. Also, letterboxes are designed with a slight downward angle on the outside flap to channel water out. Make sure yours is correctly oriented (flap hinge at top on the outside). If issues persist, you might need to add a thin rain shield or hood over the letterbox externally (some letterboxes have this feature built-in).
- Security Issues: A letterbox can be a weak point if not properly considered. Intruders have been known to “fish” through letterboxes (using rods to grab keys or open locks). To improve security, avoid leaving keys near the door. You can also install an internal letterbox cage or guard, which catches mail and blocks a direct reach through the slot. It’s a simple basket or plate that still lets mail drop but deters prying hands or tools. Also, some letterboxes have anti-fishing brushes or a small opening angle as security measures.
Remember, a well-fitted letterbox should need minimal maintenance. Occasionally tighten loose screws and keep it clean. If the finish is metallic (brass, chrome), a polish can keep it shiny; if it’s powder-coated, just wipe with a damp cloth.
DIY Letter Box Installation Made Easy
If you’ve missed your post or it’s ended up being left on your door step, installing a letterbox is one of those DIY projects that can really help how your home functions. With careful measuring, the right tools and our expert tips, we’re sure you can achieve a professional-looking result. Now you’ll never miss your post and you can take pride every time those bills plop on your door mat knowing you fitted that letterbox yourself!
Happy DIY-ing and as always, if you need further advice about fitting a letterbox, the Doors & More team (including Matt) are here to help! Just give us a call.


