

Draught-Proofing Floorboards: A DIY Guide To Insulating Your Home
Peeling back a battered carpet to discover beautiful wooden floors is a moment of great joy. Few flooring types will add as much personality to a room, with just a little loving care to get it looking its best.
But, after a while, the beauty of these floors can fade. Wood warps with age, and occasional chips or splinters can leave you with gaping spaces between your boards.
Gaping floorboards are irritating, unsafe and costly. They will swallow dust and dirt, making your room a lot harder to keep clean. Funny shaped gaps can also be a trip hazard. And probably most annoyingly, floorboard gaps will let draughts into your house – with cold air coming through the floorboards while the warm air heated by your boiler is lost.
The cost of insulation to tackle these draughts is usually pretty small. Filling gaps can be a fiddly job, but DIY draught-proofing is simple enough even with basic levels of knowledge, and the materials aren’t all that expensive either.
The initial investment can go a long way to saving money on your heating bills in the long run, in fact, the Energy Saving Trust suggests that draught-proofing your wooden floor could save you over £40 a year on your energy bills.
In this post, we’re going to look at how to insulate wooden floors (as well as skirting boards and door frames) to help you weigh up the benefits of undertaking this process.

How to Fill Gaps Between Wooden Floorboards
When it comes to filling the gaps between your floorboards, there are a few different DIY techniques for draught-proofing you might want to choose from:
- Silicone-based filler: This is a silicone-based gel or liquid which you squeeze into the gaps between the floorboards.
- Pine slivers: This is where you take small strips or slivers of reclaimed floorboards and hammer them gently into the gaps.
- Insulation Strips: This technique involves purchasing a specialist draught-proofing material, something like a thin foam board or matting that you insert between the boards to “plug” the gap.
- Mass Filler: For this technique, you mix sawdust with a glue or resin to create a bulky liquid that you place between the boards, which hardens to form a more robust filler.
Is it necessary to remove old floorboard fillers before reapplying?
It is generally beneficial to remove old fillers before reapplying new ones on floorboards.
Removing the old material ensures a smooth, clean surface, which allows the new filler to stick better and create a more effective barrier. If the existing filler is in poor condition – cracked, peeling or otherwise deteriorated – removing it is essential for longer-lasting, better looking results.
However, if the old filler is still intact and in good condition, you may be able to apply a new layer over it, depending on the product you use.
It’s also important to make sure any floorboards that are damaged beyond repair or rotten are replaced before reapplying any filler, not doing so could seriously affect the longevity of the insulation.

How to Draught-Proof Using Silicone Based Filler
Silicone-based fillers for floors can be found at most good DIY or home improvement stores. These specific flooring fillers have been specially designed to give a long-lasting finish and are often available in a good range of colours so you can match it to the shade or stain of your floors.
Being silicone-based, they remain flexible to allow for movement of the floorboards. As well as the vibrations of footfall, wooden boards will expand in heat and contract in cold and any filler you use on your floor needs to allow for this.
You would run the filler into the gaps using a mastic gun, unfortunately these don’t always allow for the greatest control, so be prepared for a messier job and some necessary clean-up.
Pros
- Allows great colour matching against the floor
- A strong compromise regarding cost and quality
Cons
- Can be difficult to control, leaving a somewhat messy finish
- Won’t last as long as other methods
Can filler be stained to match the floorboards?
Mostly yes, many floorboard fillers are stainable, but results can vary.
If you plan to stain your floor once done, be sure to choose a stainable filler specifically designed for wood, as it’s formulated to accept stains more evenly.
It’s recommended to test the stain on a small, inconspicuous area first, as some fillers may absorb the stain differently, potentially leading to a slight colour mismatch.
Use a pre-coloured filler that matches your floor colour the most as this is likely to give you the best final result.
How to Use Pine Slivers to Draught-Proof Your Floorboards
Pine slivers are probably the pinnacle of draught-proofing techniques for floorboards. If fitted as flawlessly as possible, it can be an extremely long lasting-solution.
The technique involves buying or making ‘slivers’ of floorboard to slot into the gaps between your existing floorboards. Coated in wood glue, the slivers are gently knocked into place using a rubber or wooden mallet, then can be sanded down and stained to match the old boards.
It’s a more labour intensive job and does require some DIY confidence, it’s also more expensive initially than using silicone filler, but the end result should be a floor that looks as good as new regardless of gap size. No draughts should be able to get through and, best of all, this technique should really last.
Pros
- Long lasting
- High-quality professional finish
Cons
- Expensive to buy the slivers
- Will need sanding (and possibly staining) to achieve the most attractive finish
How to Draught-Proof Using Insulation Strips
If you can’t afford pine slivers, but still want a long-lasting and neat finish, specialist insulation strips for floor boards, such as StopGap or DraughtEx, could be the answer.
Essentially acting as a floorboard draught excluder, both have been specifically designed to blend invisibly into the floors, and to last for a long time.
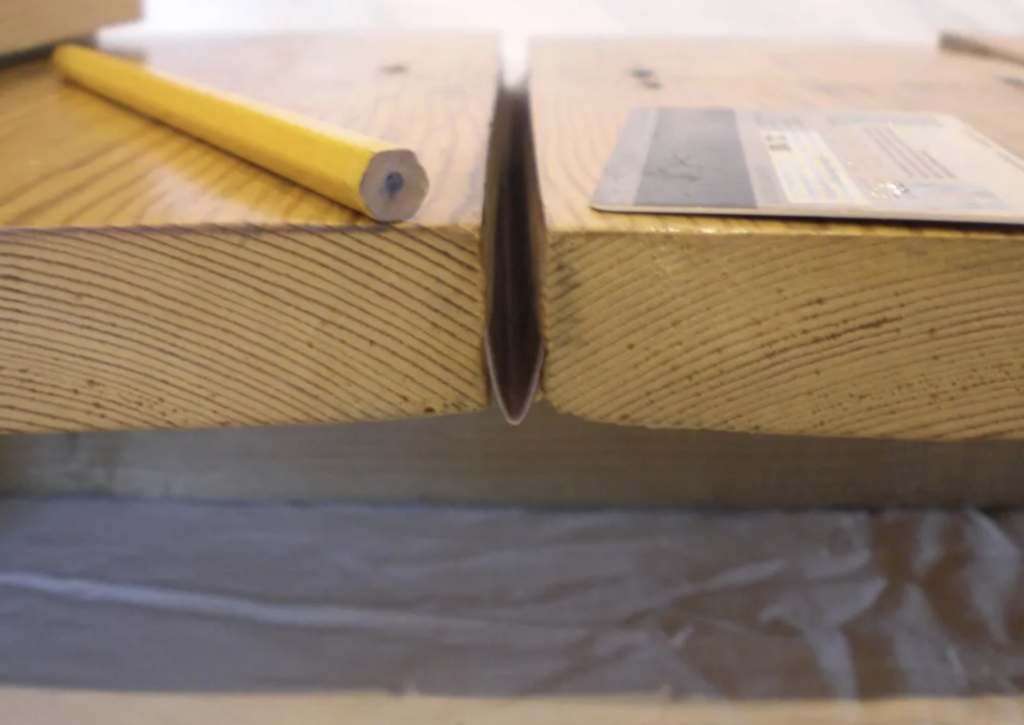
DraughtEx is a squashy, thin strip of foam that you cut to length which can then be easily pushed into the gaps using a blunt knife or credit card. It comes in 3 thickness options and allows for plenty of movement of the boards, while still maintaining the seal to prevent cold air coming up though the floor. It only comes in one colour ‘shadow’ which is intended to mimic the dark shadows that sit in the seams between boards.
StopGap works on a similar principle, though it is plastic rather than foam. When you insert this into the gaps, the v-shaped plastic strip springs back to fill the gap to stop floorboard draughts. The main issue with StopGap is its ‘neutral’ colour. While it will technically be invisible once applied, this actually means that visually you will still see the gaps between the boards.
Both DraughtEx and StopGap can be used as a draught excluder in gaping skirting board or door frame too.
Pros
- Long-lasting
- Should leave an invisible finish
- Available in a range of thicknesses to tackle many gap sizes
- Can also be used to fill gaps around skirting boards and door frames
Cons
- The range of sizes can make it a lot slower to fit than expected
- Will not visually hide or minimise the gaps
How to Draught-Proof Using Mass Filler
Mass filler is the most ‘DIY’ approach of all these techniques. That’s because not only are you inserting the filler yourself, you’ll also have to create it.
You can start with specialist resins, or even just PVA glue. Mix your chosen liquid base with liberal amounts of sawdust to achieve a ‘putty’ consistency. This can then be pushed down between the boards and should harden to plug the gaps.
This is a fiddly, but cheap way of doing it. And, because it’s cheap, it can have mixed results. The resin may not hold for long, particularly on floors that see heavy duty use.
Pros
- Cheap to do
- Requires no specialist equipment or knowledge
Cons
- The filler may shrink, crack or fall through the gaps over time
- Making the filler mix can be time consuming as you need to get it the right consistency
Having gaps in your floorboards can be ugly and costly, but with the variety of techniques available to tackle them, they are also unnecessary.

How long does floorboard filler take to dry?
The drying time for floorboard filler varies based on the type of filler used, what the room temperature is, and humidity.
Generally, it can take anywhere from a few hours to 24 hours to fully cure. Some flexible fillers or caulks might dry to the touch within an hour but may need up to a full day to harden completely.
Always check the product instructions for specific drying and curing times for best results.
There are a few more things you might want to consider before diving in to draught-proofing your floorboards…
Does draught-proofing affect ventilation?
Unfortunately draught-proofing can cause problems with ventilation, especially in older homes where cold air naturally circulates through small gaps and cracks.
While draught-proofing floors can reduce unwanted cold air and improve energy efficiency, it can also limit airflow and trap humidity, leading to condensation or dampness if not managed properly.
In rooms that need ventilation, such as kitchens and bathrooms, installing controlled ventilation (like extractor fans or trickle vents) can help maintain air quality while still preventing heat loss. Balancing insulation with adequate ventilation is the key for a healthy home.
Can draught-proofing floorboards prevent noise?
Yes, draught-proofing floorboards can help reduce noise, to a point.
By sealing the gaps with flexible fillers or insulation strips, you create a barrier that can dampen noise from footsteps and airborne sounds from below.
However, draught-proofing alone will not fully soundproof a room, adding underlays or soundproofing materials beneath floorboards would be the best option if you want to reduce noise significantly. Adding a large area rug can also help.
How long does floorboard draught-proofing last?
The longevity of floorboard draught-proofing really depends on the materials used and the amount of foot traffic.
High-quality fillers or insulation strips can last several years (up to 10 years or more) if installed correctly. However, areas with heavy foot traffic or frequent temperature and humidity changes may wear faster.
Regular checks and minor touch-ups will help extend the lifespan of the draught-proofing material so it insulates for longer.

What is the cost of DIY versus professional floorboard draught-proofing?
DIY floorboard draught-proofing typically costs between £20-£100 per room for materials like sealants, filler strips and tools, making it an affordable option if you’re comfortable with hands-on work.
The cost of hiring a professional however, can range anywhere from £200 to £1000+ due to labour costs, which will all depend on the size and complexity of the job.
While hiring a professional adds quite a significant cost, it should ensure expertise and trade quality materials that are used and installed correctly, resulting in a longer-lasting finish. Reputable tradespeople will usually guarantee their work, too.
DIY may save money but might require maintenance sooner, so it’s important to bear this in mind.
We hope this post helps you weigh up the best option for you to tackle your draughty floorboards, while none of the options are extremely quick, being able to stop draughts means you can recapture the glee you felt when you first discovered your wooden floorboards!


